How to translate your Webflow website? Webflow is a very beginner-friendly website builder because you don’t just have to drag and drop elements, and the code will be generated automatically by Webflow. This convenience makes many users use this platform to create their websites.
On the other hand, translating a Webflow site into various languages can bring in higher website traffic than usual, because audiences abroad can find your site.
Therefore, it is important to know how to translate your Webflow website using translation tools. So, in this article we will discuss how to translate it using one of the AI-based automatic translations.
Does Webflow support multilingual website?
Before going into how to translate a Webflow website, you need to know first that until now Webflow does not support multilingual.
However, there are two common solutions that can be used to create multilingual Webflow websites. These are duplicate pages and websites or use third-party translations.
Duplicating websites and pages and then translating them into different languages will certainly take a lot of time and effort and it’s not worth it if you have large websites like online stores and blogs. Especially if there is an update to the information on the website.
Therefore, using third-party integration is the right solution. There are many automatic web translation services that can help create multilingual sites quickly, one of which is Linguise.
Linguise can be a translation solution for your multilingual Webflow website, we will discuss the complete steps for using it below.
Why you should translate your Webflow website?
Translating Webflow websites offers a number of very compelling benefits. First, you can reach a wider audience globally by providing content in multiple languages. This can help you explore new markets and attract the attention of potential customers who may be more comfortable interacting in their native language.
Visitors who can understand your product or service information in their own language are more likely to take actions such as purchasing, filling out a contact form, or subscribing to a newsletter.
Translating content also provides SEO benefits, as optimizing a website for search engines in different languages can improve rankings in different regions, attracting more organic traffic and business opportunities.
Going deeper, you can later apply your SEO setup for different languages and countries to get higher traffic.
In addition to these benefits, having a multilingual website gives you a competitive advantage by demonstrating your commitment to global customer service. This means that in this modern era, it is highly recommended that a website be a multilingual website by providing various languages.
You can adjust the language or see what most spoken language in the world to see what languages may be widely used in the world.
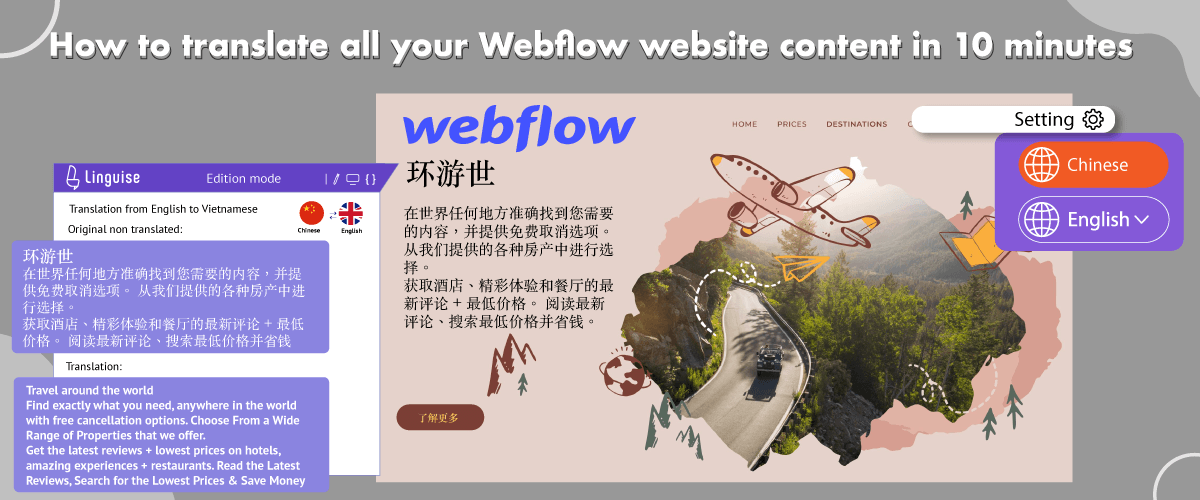
How to automatically translate your Webflow website in just minutes
After understanding what Webflow is and the importance of having the website translated into various languages, now is the time for us to try translating the Webflow website automatically using the Linguise website translation service.
Cloud AI automatic translation Linguise is an AI-based automatic translation service that is integrated with various platforms, one of which is Webflow integration.
Below we will discuss the detailed steps to install Linguise automatic translation in Webflow.
Webflow access requirement
To be able to translate Webflow using Linguise automatic translation, you need several accesses for preparation, including the following.
- Access to your Webflow domain website
- Access to your DNS web domain
Once these conditions are met, then follow the installation steps below.
Registraton Linguise and add your website Webflow
The first step is to register your Linguise account for free using a 1 month trial, or subscribe straight away. After successfully entering the Linguise dashboard, then select Add domain and fill in the following things, such as:
- Webflow URL site
- Platform, select Webflow
- Language, select the site’s default language
- Language translation, is the language that will be displayed on your site

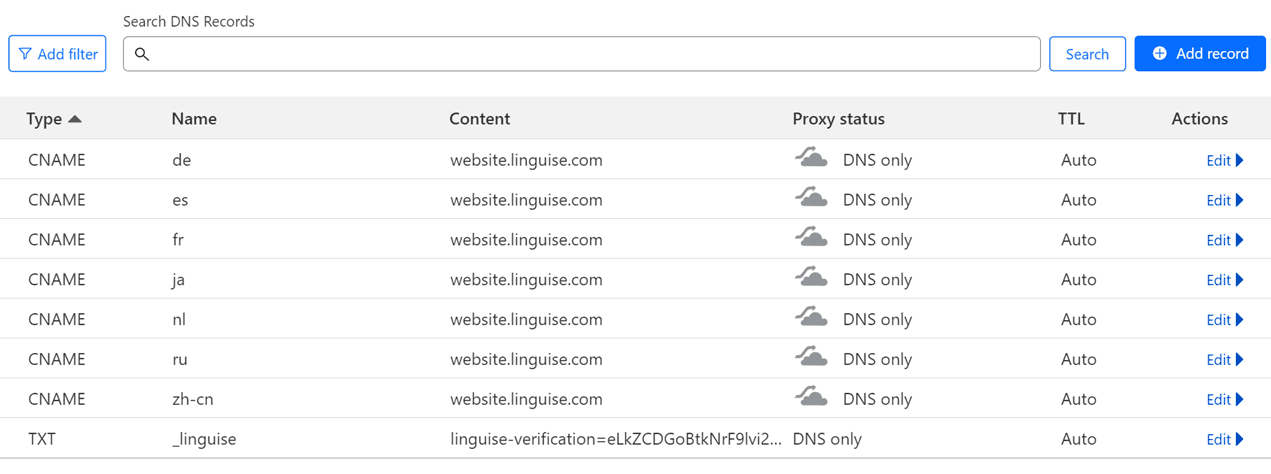
Copy DNS records
After successfully adding a domain, you will be directed to the DNS page which you will need to add to your domain.
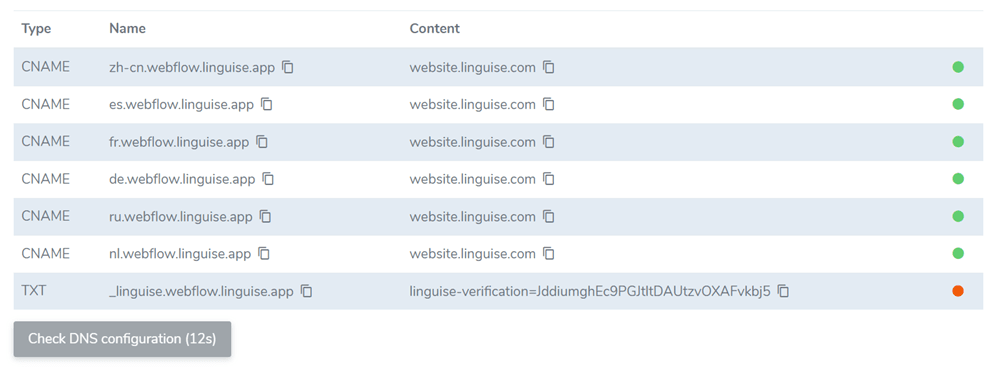
This DNS will need to be connected to your domain management via DNS settings. Some things you need to copy are:
- One TXT record is required for domain verification
- One or more CNAME records are required for the language.
After the record has been successfully added, it will look more or less like this.
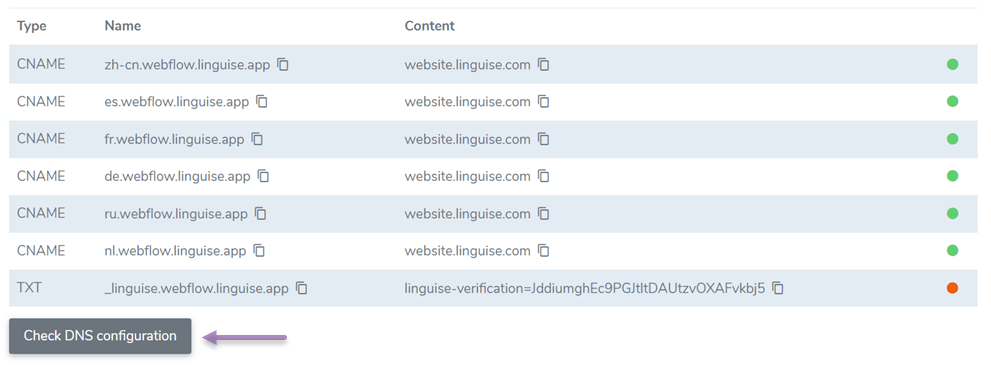
Verify DNS validation
The next step is to verify the DNS assessment by clicking Check DNS Configuration in the following image. This validation usually takes a maximum of 1 hour.
If validation is successful, a green dot will appear on the right as shown in the following image. This means that your site is ready to translate that language.
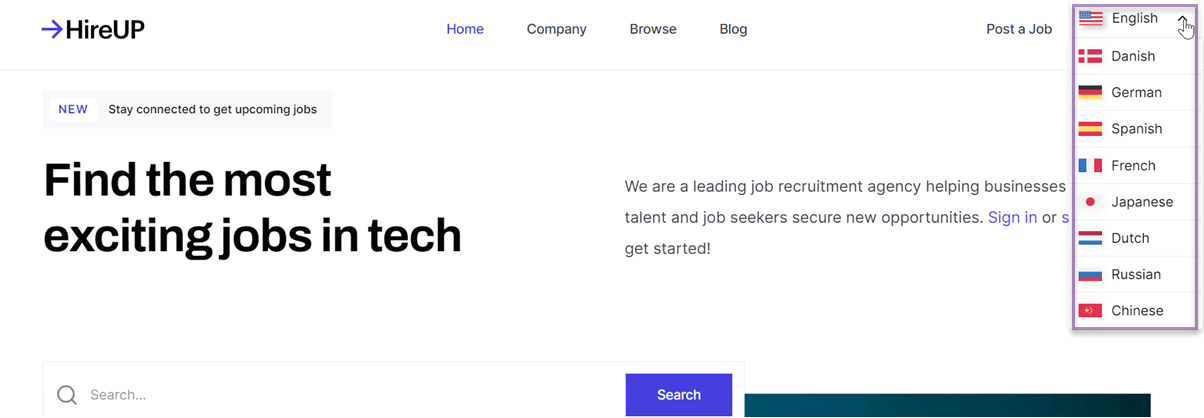
Add the language switcher to Webflow
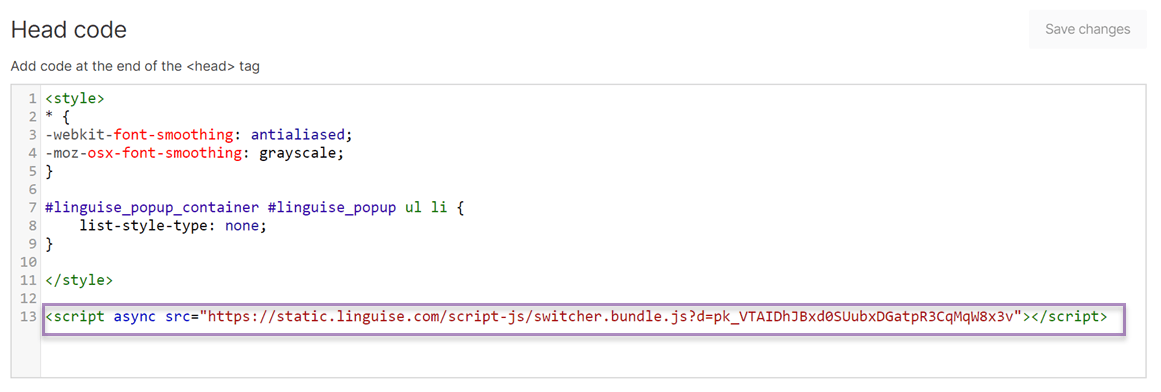
The language switcher is a flag icon that functions as a language switcher on your web page. To install it on the web, you need to paste the code in the Linguise dashboard.
Go to dashboard > Settings > scroll down > Copy to clipboard.

After that, open the Webflow dashboard, navigate to the site > right click > Settings > Custom code. Then paste the code that you copied previously and select Save changes.
Languages flags display for Webflow
Apart from setting the language switcher, you can also choose a special flag design that will later be displayed. This customization is done via the Linguise dashboard > Settings > Language flags display.

Some parts that you can adjust are the location of the language flag, whether side-by-side, dropdown, or pop up. Next, where will you place it? Finally, select whether you want to display the short name or full name language.
For details, you can also see each part in the widget below.
If so, this is more or less what the language switcher that you set earlier will look l
Frontend editor translation on Webflow
Not only a dedicated language switcher, Linguise also offers an advanced feature for editing Webflow website translations namely a frontend editor. This feature allows you to manually edit translations via the Linguise front page directly.
In fact, you just have to choose which part to translate and then edit the existing translation with the translation that you think is correct.
To do this, open the Linguise dashboard > Live Editor > Open Live Editor. This is more or less what the frontend of the Linguise editor on Webflow looks like.
Translation exclusion for website Webflow
Linguise’s additional features don’t stop there, sending translations is one of the favorite features that many users use. Many users often want to load translations, for example brand names, technical content, URLs, or others.
With this feature, users don’t need to bother anymore and don’t need to worry about the content being translated.
It’s easy, go to the Linguise dashboard then select Rules. There are several types of rules that you can choose from, including the following.
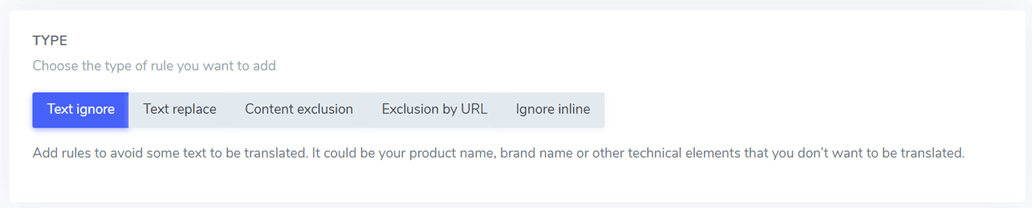
- Text ignore: This is employed to designate text that should remain untranslated, such as a brand name.
- Text replace: It is utilized to swap one text with another.
- Content exclusion: This entails the exclusion of particular content from a page.
- URL-based exclusion: It pertains to excluding content based on its URL.
- Inline exclusion: This is used to omit content that extends over several lines.
You can also follow the steps on how to translate your Webflow website via the video below.
Also find more multilingual website installation videos on the Linguise channel!
Linguise advantages for translating Webflow websites
After understanding how to translate your Webflow site using Linguise, someone might ask why you should use Linguise to automatically translate your website?
Below are some of the advantages of Linguise for translating Wwebflow websites.
- Based cloud AI translation: Linguise harnesses the cutting-edge AI translation model, enabling seamless automatic translation. The translation results are consistently refreshed every three months.
- Up to 80 languages: With a diverse selection of over 80 languages available, you won’t have to manually generate content in each language, as Linguise will handle automatic translation into your chosen languages.
- SEO multilingual: Linguise has been meticulously developed with a strong focus on SEO optimization. From crafting SEO-friendly URLs to incorporating alternative links and expanding its search engine optimization capabilities beyond Google, Linguise helps you achieve global visibility across various search engines.
- Real-time translation updates: Consider the scenario where, upon adding a new page to your website, you have the capability to instantly generate 20 additional pages in various languages. With Linguise at your disposal, accomplishing this task is effortless, and the indexing of the page will commence promptly.
- Try before you subscribe: Linguise offers users the convenience of testing its features before committing to a subscription. Enjoy a one-month free trial without the need for a credit card.
- Advanced features: Lastly, Linguise offers a wide selection of advanced features that you can take advantage of when translating Webflow websites.
Translate your Webflow website, now!
At this point you already know how to translate all your Webflow sites in just minutes! Webflow is one of the website builders that many users use to build their sites.
For you site owners, it is time to create a multilingual site so that more people visit your site. Translating a site into different languages also provides many other benefits.
Therefore it is important to choose the right automatic translation service like Linguise because it is able to provide fast and accurate translation results!