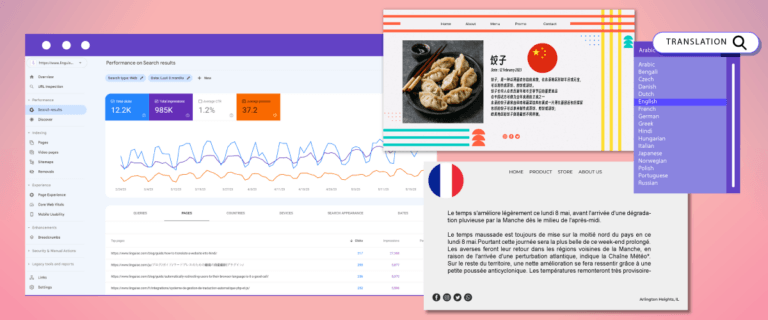
It is important to pay extra attention to language-switching elements when creating a multilingual website. This is because users will visit this section frequently when they want to switch languages.
Likewise for those of you who own PrestaShop multilingual sites. Therefore, it is important to create a language switcher for PrestaShop that is friendly, accessible, and simple to use.
In this article, we will discuss how to set up a language switcher for PrestaShop . So, for multilingual websites or eCommerce owners on PrestaShop , read this article until the end to get the complete guide!
Why language switcher is important for multilingual websites PrestaShop?
A language switcher is one element that must be present on a multilingual website because this is what users will often visit and use when switching languages.
Apart from being used to switch languages, what is the importance of a language switcher for a PrestaShop multilingual website? See the complete explanation below.
- Enhanced user experience: An easily navigable language switcher facilitates seamless transitions between languages, simplifying user navigation and comprehension of content. This enhancement contributes to an overall positive user experience, minimizing frustration and boosting user engagement.
- Intuitive navigation: The language switcher should be effortlessly discoverable and user-friendly. A well-designed interface ensures the switcher is prominently positioned and employs clear, easily identifiable icons or labels, encouraging users to effortlessly switch between languages.
- Reduced bounce rate: The user-friendly language switcher plays a role in diminishing bounce rates. When visitors can promptly locate and choose their preferred language, they are more likely to stay on the website, explore its content, and potentially convert.
- Effective communication: Language switchers should effectively communicate with users. Clear and concise labels or symbols assist in conveying available language options, mitigating confusion, and empowering users to make informed choices.
- SEO optimization: Search engines factor in user experience when ranking websites. A well-executed, user-friendly language switcher can positively impact SEO, enhancing the visibility and accessibility of your site to users conducting searches in various languages.
- Language performance measurement: Some language switcher modules, like Linguise provide language performance analysis, allowing you to see how each language version performs on your site. This can help you optimize your language strategy based on real user data.
How to setup the language switcher for PrestaShop?
A language switcher is one of the elements or features that is usually provided by translation services and users only need to customize it.
However, not all translation services provide a language-switching feature that is easy to modify and flexible and offers various customizations.
However, Linguise can be a solution for those of you who want a friendly and easy-to-customize PrestaShop language switcher.
Linguise Automatic Translation is a website translation service that can translate automatically in just a few seconds. It integrates with more than 40 CMS platforms, including automatic translation for PrestaShop.
With Linguise, you can create a friendly PrestaShop website language switcher that is easy for visitors to use so that it can provide extraordinary benefits. There are several steps to set up the language switcher website PrestaShop, here are some steps.
Step 1: Registering Linguise free account
To take advantage of the language-switching feature in Linguise and be able to translate PrestaShop eCommerce, the first step you need to take is to register an account on the Linguise platform. Linguise also offers a one-month free trial, allowing you to access the various features available in the service.
Step 2: Add domain website PrestaShop
The next stage involves adding the website domain to the Linguise dashboard. Some information needs to be filled in.
- Account
- URLs
- Platform, choose PrestaShop
- Language
- Translation language
- Translate URL
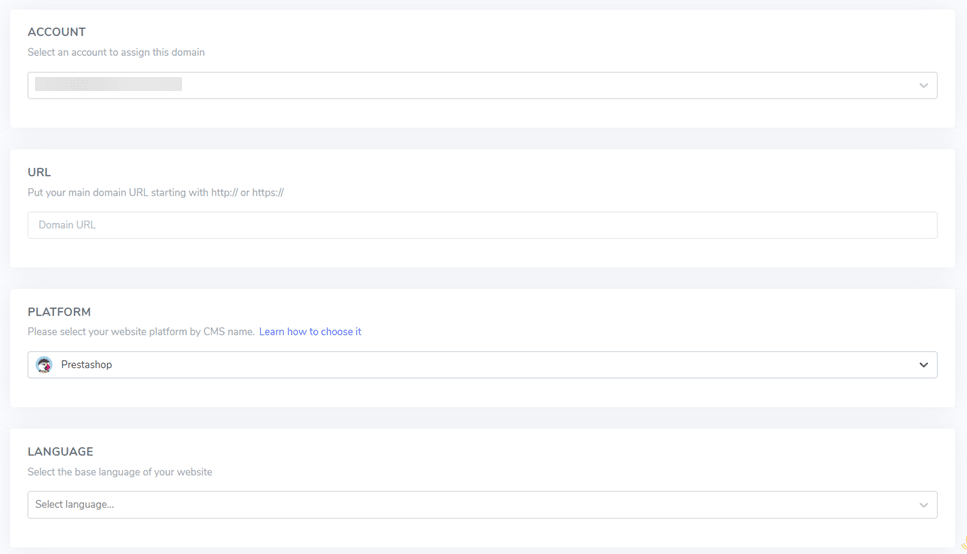
The next step is to activate the API key and set the language URL. For detailed instructions on how to add a website domain, please refer to the guide to install Linguise automatic translation in PrestaShop or watch the video tutorial below.
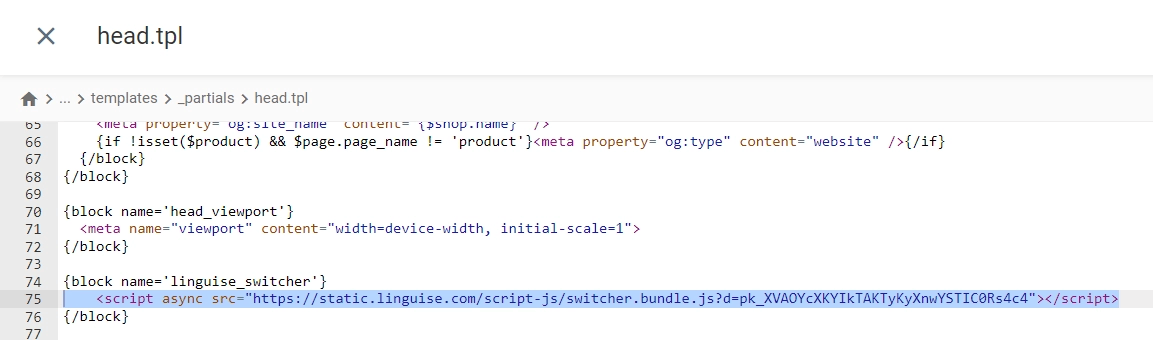
Step 3: Enabled language switcher
After completing all the configurations, the next step will enter the language switch configuration and display a flag to make it easier for users when switch languages. To do this, copy the code available in the Linguise dashboard, go to the Linguise dashboard > Settings > copy to clipboard.

Insert the above script in the page header ie …/themes/your-theme/templates/_partials/head.tpl
Advanced customization of the language switcher can be done in the steps below.
Step 4: Setup main display
In this step we will further set up the language switcher design which you can find in the Linguise dashboard > Settings > Language flags display.
In the first setup, we will configure the main display. Several parts need attention.
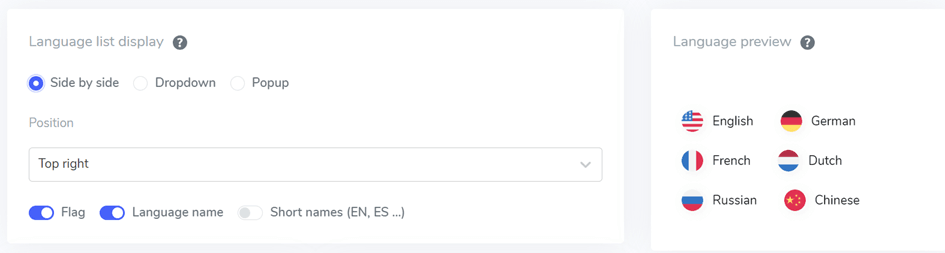
The first is the language list display form, here, you can choose from the three available options, namely side by side, dropdown, or popup. Then on the left, there is a preview display of each list form.
The first form is side by side as follows.
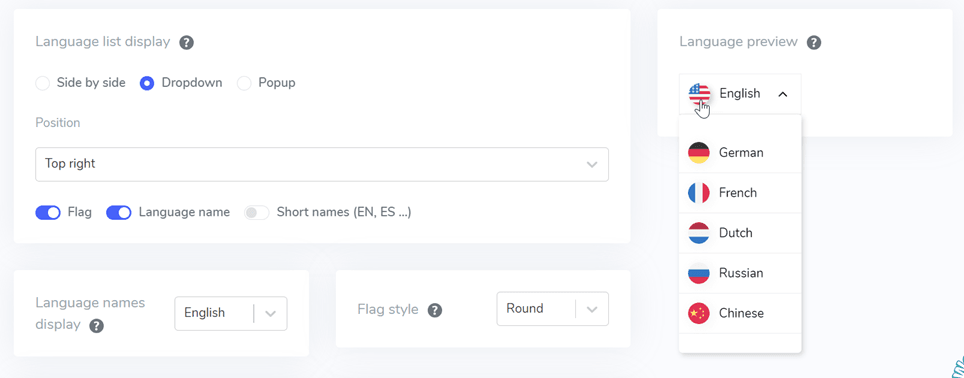
The second form is a dropdown as below.
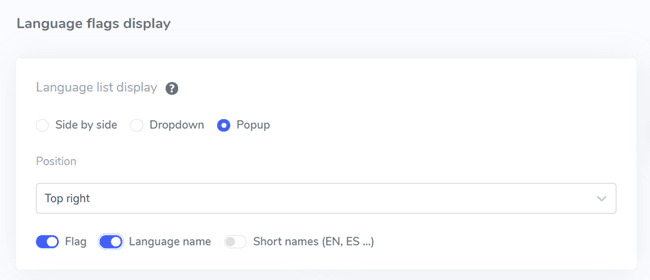
Lastly is the popup form.
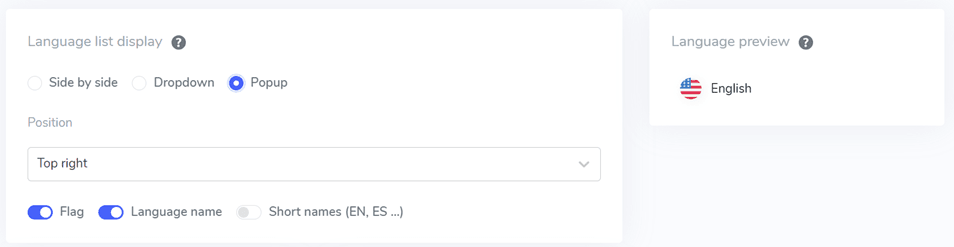
Next is to set the position, this position option shows where the language switcher will be placed. You can choose from various position options available. Make sure to choose a position that is easy for visitors to find.
Finally, choose the combination of flag + language name, flag + short name, or just the flag.
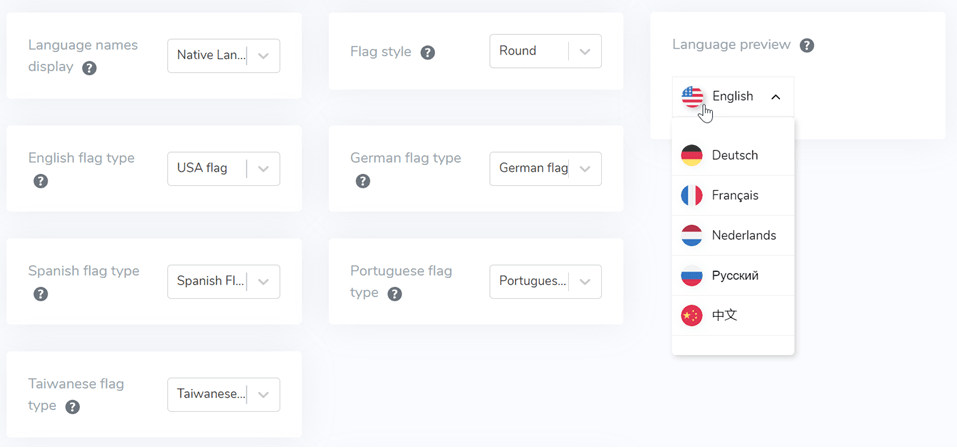
Step 5: Setup flags design
Next, below the main display, there are design settings for the flag. Some setting options can be found in the following image.
- Language name display: you can select the name display based on the country name or language name, for example, “German” or “Deutsch.”
- English flag type: this option is used for languages that have more than one type, for example, “English USA” or “English Britain” (similar to Spanish, Taiwanese, German, and Portuguese).
- Flag style: Used to measure the shape of the flag icon, whether round or square (rectangular).
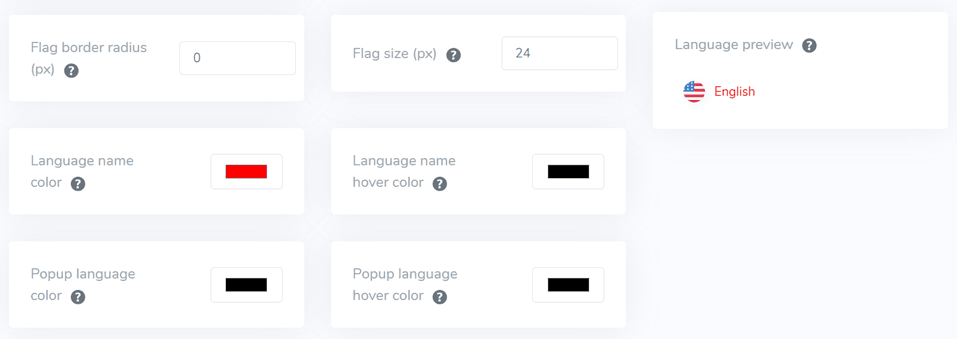
Step 6: Choose the color and size of the flag
The next step after configuring the flag design is adjusting colors, size, and various other elements. In the following display, there are several customizable settings, such as:
- Flag border-radius: Customizing the border radius in pixels when using a rectangle.
- Language name color: Choosing the default text color for the language name.
- Popup language color: Color of the language title on the popup or dropdown areas.
- Flag size: Adjusting the size of the flag.
- Language name hover color: Mouse hover text color for language names.
- Popup language hover color: The mouse hovers the text color of the language title in the popup or dropdown.
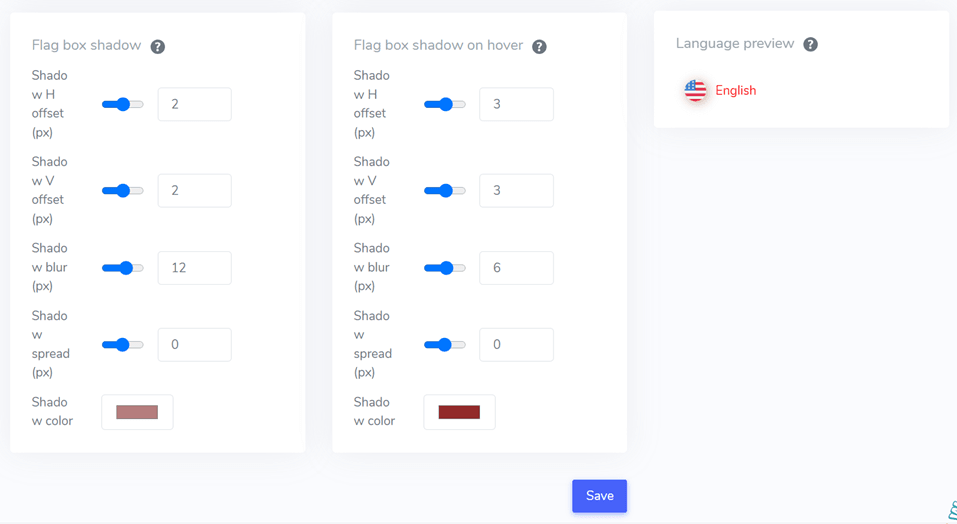
Step 7: Adjust flag box-shadow
In the final stage, you can make settings for the shadow setup on the flag. The first setting allows you to define a shadow for each flag on your website, and the next is a shadow for the language flag on hover.
If so, don’t forget to select Save to save the language switcher customization.
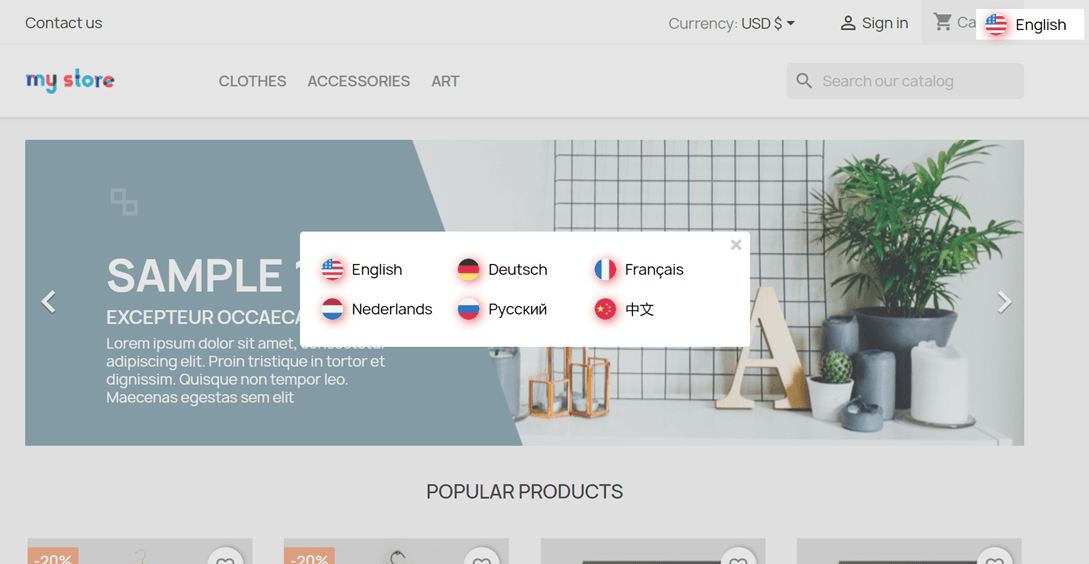
After you set up the language switcher for PrestaShop, here are the results of the language switcher.
Tips for optimizing your language switcher PrestaShop
Optimizing the language switcher in PrestaShop is essential for providing a seamless and user-friendly experience for customers who speak different languages. Here are some tips to help you optimize your language switcher in PrestaShop.
- Install and activate languages: make sure you have installed and activated all the languages you want to support on your PrestaShop store. You can do this in the “Localization” section under the “International” tab.
- Use a clear language Switcher: Place the language switcher prominently on your website, typically in the header or footer. Use clear and easily recognizable language icons or flags for each language to make it intuitive for users.
- Consider language names: Instead of using flags, consider using the language names in their native form. Flags can be confusing as some languages may be spoken in multiple countries with different flags.
- Enable friendly URLs for Languages: Enable SEO-friendly URLs for each language. This can be done in the “Preferences” section under the “SEO & URLs” tab. This helps search engines index your pages correctly for each language.
- Set default language: Set a default language for your store. This is the language that visitors will see when they first land on your site. You can set the default language in the “Localization” section.
- Optimize language-specific content: Ensure that your product descriptions, meta tags, and other content are translated accurately for each language. This is crucial for SEO and providing a meaningful experience to users in different languages.
- Enable language auto-detection: Consider implementing language auto-detection based on the user’s browser settings. This can provide a more personalized experience for visitors, automatically displaying content in their preferred language.
- Keep language switcher consistent: Maintain consistency in the language switcher across all pages of your website. Users should be able to switch languages easily, regardless of the page they are on.
By following these tips, you can create a more effective and user-friendly language switcher in PrestaShop, catering to a diverse audience and enhancing the overall shopping experience of your store.
Setup the language switcher PrestaShop using Linguise!
So far, you have understood the language switcher settings for PrestaShop. Making a language switcher can provide several benefits, after that, don’t forget to optimize according to the points explained above.
With proper optimization of the language switcher, it can improve the user experience.
So what are you waiting for? Register a Linguise account, register a PrestaShop website, and configure the language switcher to provide a better user experience.