Creating a multilingual website is a challenge in itself. One important element is setting up a language switcher or toggle button. The language switcher allows visitors to switch between different languages easily.
Providing a user-friendly language switcher on all websites, including Tilda’s websites, is crucial.
This article will discuss setting up a language switcher on the Tilda platform, a powerful yet easy-to-use website builder. Following this comprehensive guide, you can provide multilingual features with an easy-to-use language switcher.
Why should you customize a language switcher for the multilingual Tilda website?
Before discussing how to set up a language switcher on a Tilda website, it’s important to understand why you need to customize the language switcher on Tilda.
- Enhancing user experience: Websites offering content in multiple languages make visitors feel accommodated. A user-friendly language switcher allows visitors to navigate and understand content in their preferred language easily. This creates a more immersive and satisfying visitor experience, increasing engagement and loyalty to your website.
- Expanding market reach: By translating your Tilda website into popular languages such as Mandarin, Spanish, Arabic, and others, you can reach a much larger audience worldwide. This opens up new market opportunities and enables your business to go global by targeting customers from different countries and cultures.
- Optimizing multilingual SEO: Search engines like Google consider user experience factors in ranking websites. A user-friendly language switcher can improve your multilingual SEO ranking by making it easier for visitors to access content in their language. Translating content correctly also sends positive signals to search engines that your site is relevant to various queries in various languages.
- Increasing sales conversions: By providing content in languages visitors understand, you can increase the likelihood of conversions such as product purchases or service registrations. If visitors can easily understand product details, policies, and checkout processes in their language, barriers to purchasing decisions will be reduced.
How to setup a language switcher on Tilda
After understanding the importance of setting up a language switcher on a Tilda website, let’s discuss how. Website translation services typically offer this feature, which can be customized according to user needs.
However, not all translation services offer easily customizable and user-friendly language switchers. Therefore, choosing an automatic translation service compatible with various CMS platforms and providing flexible language switcher features is important.
One automatic translation service that meets these criteria is Linguise. Linguise offers a highly customizable and user-friendly language switcher feature integrated with CMS and website builders like Tilda.
Here is a complete guide on how to set up the language switcher feature for a Tilda website using Linguise.
Step 1: Register Linguise account
The first step is to register for a free Linguise account to set up the language switcher on Tilda. You only need to prepare an email, username, and password without providing credit card information.
Furthermore, before subscribing, you can take advantage of the free trial feature for one month, which has a limit of 600,000 words.
Step 2: Add domain website Tilda
Step two is adding the website domain you own to the Linguise dashboard. You need to fill out several fields to add a Tilda domain in Linguise.
- Account Linguise
- URL domain
- Platform website
- Default language
- Translation languages
- Translate URLs
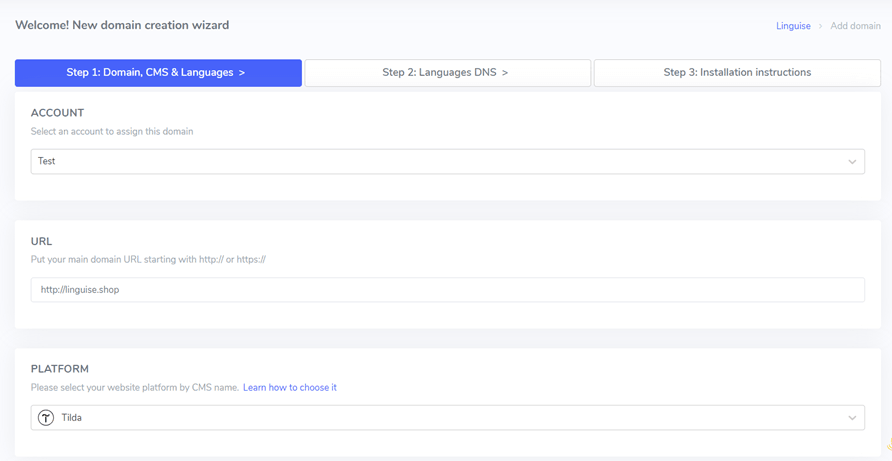
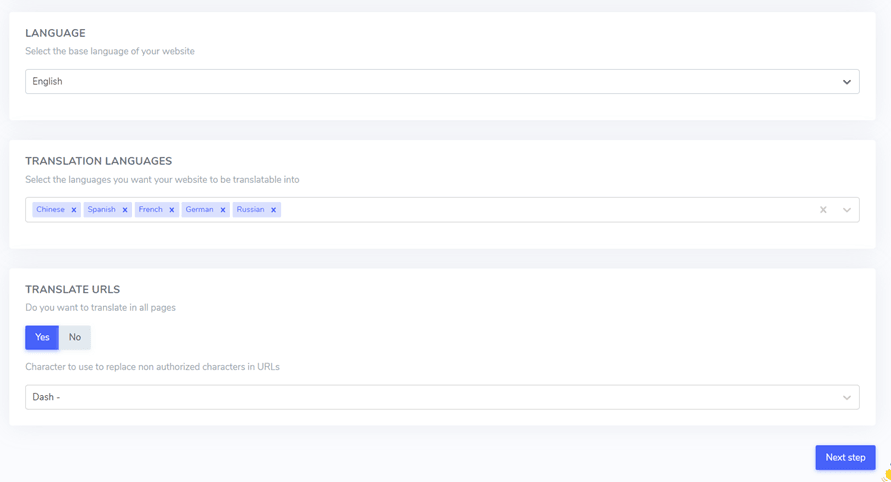
After that, you need to configure DNS setup. For a detailed guide on DNS configuration, you can refer to the article how to implement automatic translation on a Tilda website.
Step 3: Enable language switcher
Once the DNS configuration is complete, activating the language switcher is time. To do so, insert the script provided by Linguise into the Tilda website editor.
Here’s how.
- Open your Tilda website dashboard.
- Click on “Site Settings” > “More” > “Edit code.”

Next, insert the script you obtained from the Linguise dashboard, then click “Save” to save the changes.
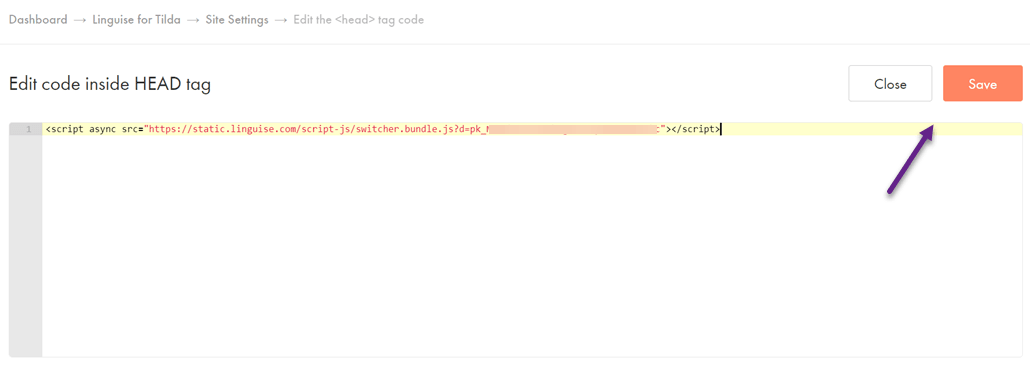
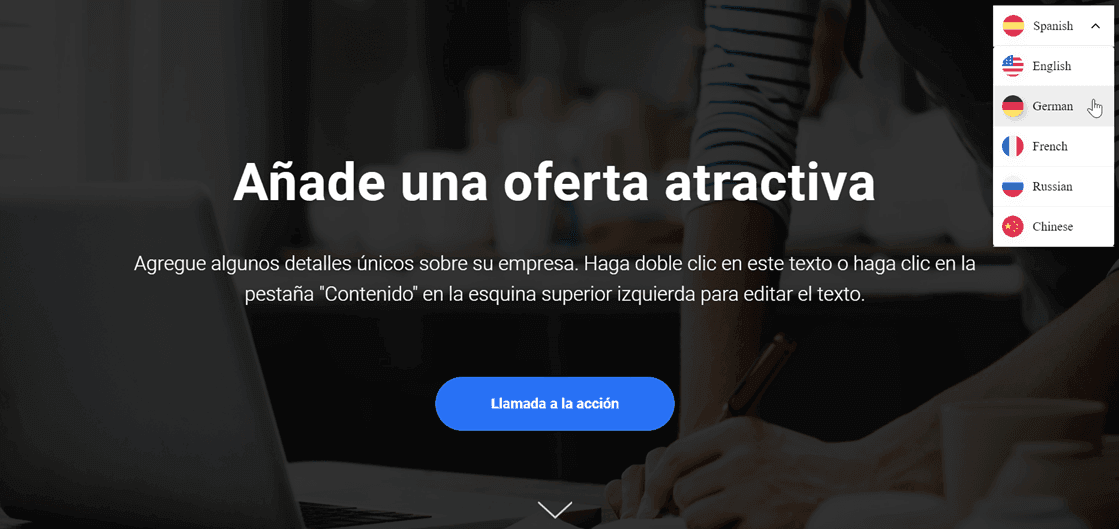
After successfully connecting, your Tilda website will automatically display the language switcher by default. You can customize the language switcher setup according to your needs.
Step 4: Setup main display
To begin customizing the language switcher, you can find the settings in the Linguise dashboard under “Settings” > “Language flags display.”
On this page, you can configure several options. The first is the main display. Here, you can adjust various settings such as.
- Flag Icon Style: You can choose from 3 options; side-by-side display, dropdown menu, or popup.
- Position: This option determines where the language switcher will be placed on your site. Various position options are available. Make sure to select a position that is easily accessible to visitors.
Finally, you can combine the display of flags and language names, flags and language abbreviations, or language names alone. It’s recommended that flags be used along with language names for easier user recognition.

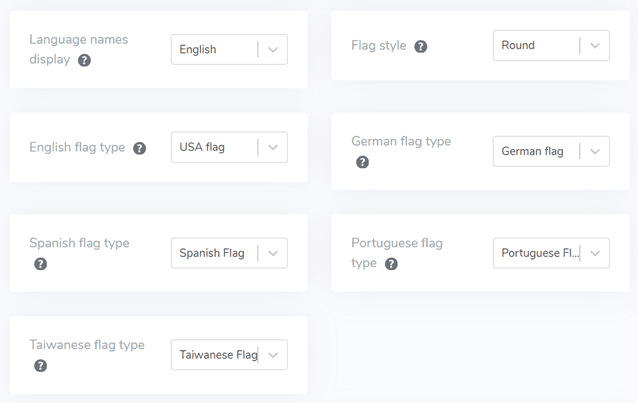
Step 5: Set flags design
After setting up the main display, you can then customize the design of the flags that will be displayed.
- Display Language Name: You can choose to display the language name based on either the country name or the language name itself. For example, you could display “French” or “Français”.
- English Flag Type: This option is used for languages with multiple variations, such as US English or British English (the same applies to languages like Spanish, Taiwanese, German, and Portuguese).
- Flag Style: This allows you to set the shape of the flag icon, either round or rectangular.
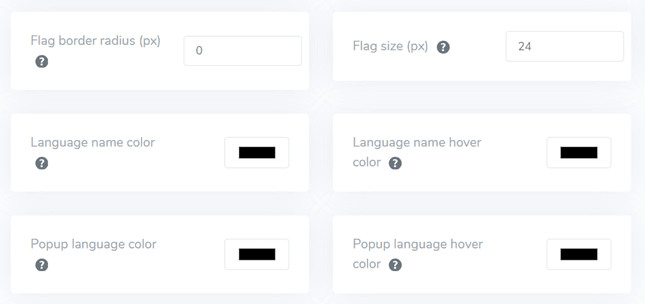
Step 6: Set color and flag size
Once you’ve finished configuring the flag design, you can customize the color and size of the flags. Here are some settings you can adjust:
- Mark Border-Radius: Customize the border radius in pixels using the rectangular flag style.
- Language Name Color: Choose the default text color to display the language name.
- Popup Language Color: Set the color of the language title text in the popup or dropdown area.
- Flag Size: Adjust the size of the flag icons.
- Language Name Hover Color: Set the text color that appears when the user hovers over the language name.
- Popup Language Hover Color: Set the text color that appears when the user hovers over the language title in the popup or dropdown area.
Step 7: Set up flag box-shadow
Finally, you can configure the flag box shadow settings. The first setting allows you to apply a shadow effect to each flag icon displayed on your website. The next setting controls the shadow effect when users hover their mouse over the language flags.
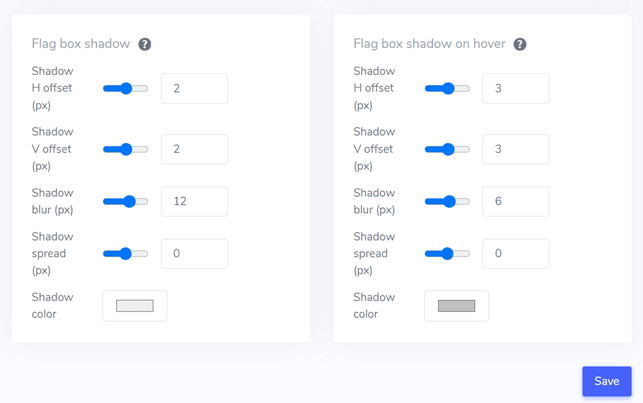
If you’ve adjusted everything to your satisfaction, click Save to save the customization changes. After that, open your Tilda website to see if the configuration has been successfully applied. This is more or less how the language switcher will appear.
Best practices for creating a user-friendly language switcher on the Tilda website
After understanding how to set up a language switcher on a Tilda website, you must also know the best practices for designing a language selector. Below are some important points to consider:
- Use easily recognizable language icons or flags – Utilizing familiar and widely known symbols across cultures will help visitors easily identify language options. Ensure the icons/flags are visible, have good color contrast, and are universally understood to avoid confusion.
- Place the language switcher button strategically – Position the button in an area that is easily visible and accessible to visitors, such as the website’s header, footer, or main navigation menu. Consistently place it on all pages to ensure easy access for visitors from various entry points. These areas are intuitive places for most internet users to look for language options.
- Label each icon/flag with the respective language – You can provide labels using the full original names of the languages, for example, “English” for English, “Español” for Spanish, “Deutsch” for German, and so on. This step will facilitate selecting the desired language, especially for visitors who may not recognize certain flags or language abbreviations.
- Simplify the language switching process – Avoid dropdown features, long lists of flags/icons, or toggle buttons that can complicate and confuse users. Ensure that visitors can switch languages with just one click on the desired language option to provide a smoother experience.
- Implement responsive language switcher design – Ensure the button is responsive and functions well on various devices and screen sizes, including desktops, tablets, and smartphones. Test it on various devices and screen resolutions to ensure a seamless user experience without cropping or overlapping elements.
Conclusion: Setup the language switcher for the Tilda website with Linguise
After discussing how to set up a user-friendly language switcher on Tilda’s websites, you now understand various best practices that can be implemented. By optimizing the language switcher according to the points mentioned above, you can enhance the overall user experience.
Linguise is one of the leading automatic translation services that offers powerful yet easy-to-customize language switcher features. Linguise is also compatible with many popular CMS platforms and web builders like Tilda.
So, what are you waiting for? Register your Linguise account now, add your Tilda website, and customize the language switcher settings to improve the experience for visitors worldwide. Optimize your global business potential by reaching multinational audiences through accurately translated content.